Forum Archives » Complete » EAW » How to Make an Instrument Panel
Page 4 of 5 < 1 2 3 4 5 >
Topic Options
Hop to:
#2426974 - 01/20/08 03:58 AM Re: How to Make an Instrument Panel [Re: Ecv56SERA]
Crashin' Jack Offline
Member

Registered: 10/02/03
Loc: Chicago
Sera has just sent me a package with his cockpit in its current state. I added the TPC I made (he did one from the image online.) I was amazed how it turned out!


This aircraft is a very small plane, only 18.67 feet (5.69 m) and the cockpit is TINY! Wow, do you get that feel in this cockpit. You still get a nice view around, and tons of detail. Awesome job, Sera!!! I am going to resist showing you more, becuase you need to see it in 3D for yourself.

Cheers!
_________________________
"Blasts from clustered R4M quartets in my snout
And see these English planes go burn...." Blue Oyster Cult

http://members.aol.com/brokenputer/crashin_jack.htm

http://www.sandbaggereaw.com/crashinjack.html


Top Bookmark and Share
#2427426 - 01/20/08 09:16 PM Re: How to Make an Instrument Panel [Re: Crashin' Jack]
Ecv56SERA Offline
Member

Registered: 10/19/04
Loc: Argentina
Thank you CJ!
Can you accommodate the needles in the gauges?
Does the me163 have a single indicator of ammunition, that you can correct?
Can you send me their work when this ended one? in that way I can continue the cockpit.
Again thank you!
_________________________
FOREVER EAW.!


Top Bookmark and Share

#2427867 - 01/21/08 12:24 PM Re: How to Make an Instrument Panel [Re: Crashin' Jack]
vonOben Offline
Member

Registered: 01/07/01
Loc: Skane, Sweden
Thanks for this tutorial Jack .
I hope we will se new EAW cockpits as a result ;\)

Cheers
_________________________
vonOben


“Wer den Tod fürchtet, hat das Leben verloren.” /Johann Gottfried Seume

vonOben\'s Flight Sim Mods

EAW Newbie Tutorial


Finnish Air War

Top Bookmark and Share
#2427984 - 01/21/08 04:44 PM Re: How to Make an Instrument Panel [Re: vonOben]
Crashin' Jack Offline
Member

Registered: 10/02/03
Loc: Chicago
Thanks Per, I hope to see a few more people become involved as well!

Sera, I made some changes and added the ammo counters and the landing gear indicater:
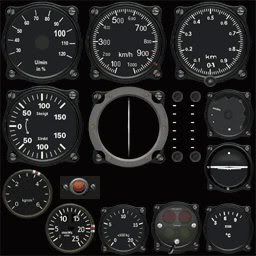


I just need to map the locations and it's good to go.

Now, I'm going to take you through the steps for editing the new cockpit. First we need a new image of the instrument panel view. Ideally we want this view without any of the needles and sprites floating around the cockpit so we can have a clear view. So first we will create a new Pview file without any instruments in it. You will need the Cockpit Editor installed now. It is available at my addons page at Tally Ho:

http://www.sandbaggereaw.com/crashinjack/CockpitEditor12CE.zip

The readme gives instructions on installing the editor. I would definitely recommend a clean install!

First of all, back up your "cockpits" folder that was installed by the editor. We are going to be creating a new cockpit, so whichever cpt file you are creating is going to get overwritten. The editor does make a backup copy, but if you hit save again you will have lost the original.

Start the game, and when you get top the main screen use Ctrl-E to start the editor. You should see a screen that looks like this:


Go to the main menu in the top left and select New Plane:


Choose the nationality of the aircraft slot:


Then choose the specific slot:
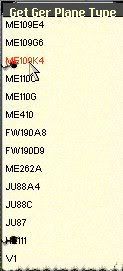


This will automatically load all of the default images for this slot, but anything that appears inside the cockpit will be black. This is okay! Now we need to add the palettes. Select New Pals from the Main Menu:


This brings up the Palette Menu. Select the Day Pal slot:
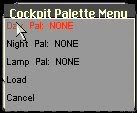


This brings up the Col Menu. "Col" is the extension of the palettes used as building blocks for the program. Select the proper DayFade col, in this case for the Germans:
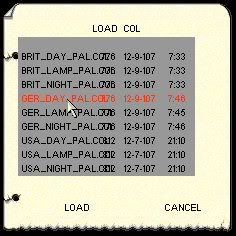


Click on Load, and you will be returned to the palette menu. Select the other two palettes, then click on Load in the Pal Menu:
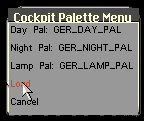


This will load all three palettes. You should now see everything in the cockpit in full color:
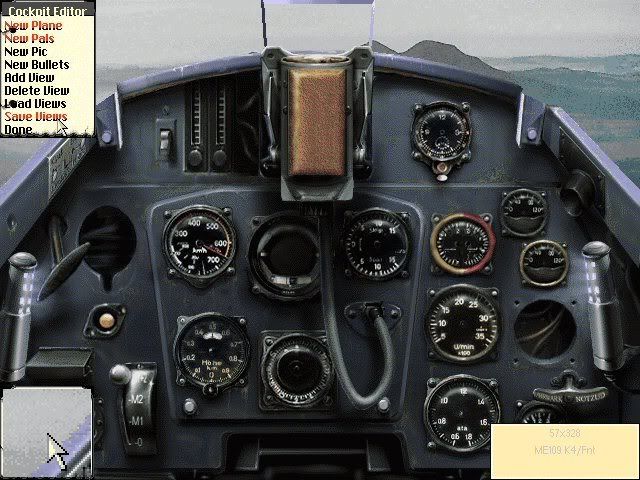


Click on "Save Views" as shown in the above image. The cursor will lock up for a few moments while the new Pview file is created. Now click on Done:


This will exit the editor and take you back into the game main screen. Go ahead and exit the game. Now look in the "cockpits" folder and you should see a new Pview file for the slot you are using. Copy this into the main EAW folder. Also put your new cockpit files into the folder - these shuld be for the new 3DZ cockpit you are creating. Go to your EAE.INI file and change the size to 640x480. This is very important, as the editor only works in this size.

Go into the game, and fly your new aircraft. When you are in game, hit Ctrl-F1. This will bring up the 2D instrument panel view. Now hit F8. This will change the view to the virtual cockpit, but still looking at the same spot. DON'T TOUCH YOUR MOUSE!!!! Don't change the view in any way. Wait for a moment when there are no messages on the bottom of the screen - the hud in the lower left is okay. Take a screen shot - for me this is hitting the "Print Screen" button - and exit the game.

There should now be a new image in your main EAW directory called something like SCRN0001.BMP. Open this in PSP (or alternatively, simply start PSP and hit Ctrl-V - this will load the clipboard directly into a new image) and go to Image/Palette/Load Palette. Load the palette you saved long ago from the original cockpit - in my case this was the me163 cockpit palette.Save the image as a PCX. Exit Paint Shop Pro.

Copy your new PCX image to your Picpac folder and start Picpac. Remove anything shown in the white window on the right, and add your new image. Now select the USER option as the default output extension and THEN deselect "Save Palette." The image has palette info, but you don't want the actual palette attached. Compress the file. This should result in a new "pic" file in your Picpac directory.

You need to rename the image so that the editor will be able to load it. The convention is "P**##L.PIC" or "P**##H.PIC." "**" is the slot, and "##" is the view. "L" is the normal type of view, and "H" is the 45 degree up view. You don't really have to make the numbers and H-L right for this step - that is only needed for the autoloading feature - But you DO have to follow the convention. I have found numbers up to 33 work in the first two (most numbers up to 24 are in use - use something higher) and anything between 11 and 17 works for the second set, the view numbers. I have been using "P3311L.PIC" for my work. Rename you pic file and copy it into the "pic" folder in EAW used by the editor.

Now, restart EAW and go into the editor. Instead of doing all of the steps we did before, use the "Load Views" option on the Main Menu:
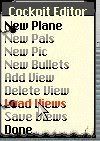


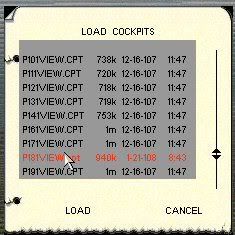
This brings up the "Load Cockpits" menu. Scroll down to the one you created earlier - in this case it is the P181VIEW.CPT, the Pview file for the Me-109K:


Now your screen should look something like this:
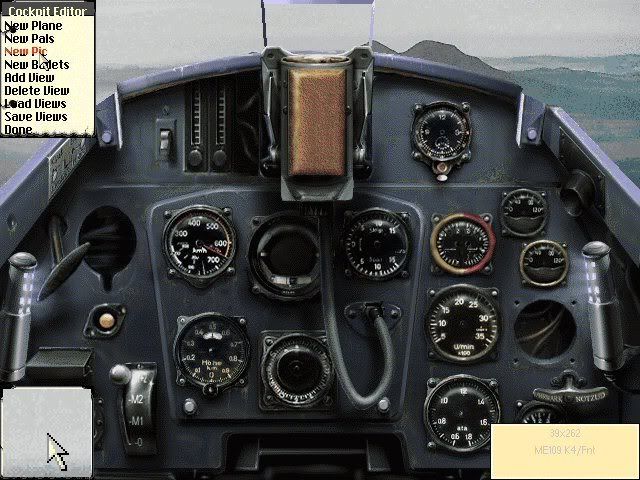


Select "New Pic" from the Main Menu as shown above, and the "Load View" menu appears:
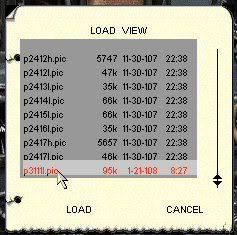


Scroll down to the new pic file you created, and load it. Your new view should be loaded:
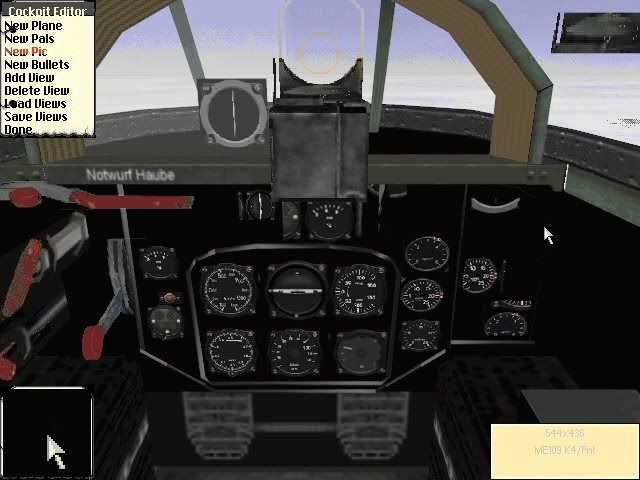


Click on "Save Views" and your new view is now part of the P***VIEW.CPT file you created, and will be used when you use the 2D view in 640x480. You could use the same procedure to create all of the rest of the views as well, but you would also have to create sprites to use for the canopy rails when looking straight ahead.

All of the instruments will now be blanked out with one exception. The Artificial Horizon will still be active in-game as this is controlled by the VCG****.DAT file - the only gauge set up this way.

Now you have an image suitable to do your editing on. Now you should be able to add all of the gauges and line them up properly with out having to go back and forth from the editor to ingame, make an adjustment, repeat, etc.

Well, that's all for now folks!

Cheers!
_________________________
"Blasts from clustered R4M quartets in my snout
And see these English planes go burn...." Blue Oyster Cult

http://members.aol.com/brokenputer/crashin_jack.htm

http://www.sandbaggereaw.com/crashinjack.html

Top Bookmark and Share
#2430380 - 01/24/08 03:04 PM Re: How to Make an Instrument Panel [Re: Crashin' Jack]
Crashin' Jack Offline
Member

Registered: 10/02/03
Loc: Chicago
ADDING A NEW GAUGE

Now we are ready to add a new gauge to the cockpit. Start the game and open up the editor. Load the Pview file you are working with by clicking on "Load Views" in the main menu:


Scroll down to your cockpit file, click on it and press "Load." Your new cockpit will appear on the screen:


To create a new gauge, press "Alt G" to bring up the New Gauge menu:


Most of the names should be obvious if you think about the gauge you want to make. An airspeed indicator for example is a needle, a compass is a strip, landing gear or flaps are a sprite, ammo counters are a bar. Play around with these a bit and you will see what is what.

A note here about some types of gauges. I have not been able to get the strips working. These are for Gyro 1 and Gyro 2, and the strip for the Altimeter. All of the other sprites use a similar format, they are either a single picture or a series of pictures. But the strips are meant to scroll. I have not been able to properly extract these gauges from the CPT file to work with the editor, but I can show you how to add them manually with a hex editor. It really is very simple to do, so don't worry. I will show you how to do that in one of the next lessons.

In the meantime, if anyone has further info on these types of sprites, I would love to hear about it.

So, select the type of gauge you want to do and click on the appropriate type. We are going to make a Vertical indicator, so I click on "Needle" as it uses only one needle. This brings up the "Gauge Type" menu. Here I click on "Vertical" then load it:


This causes the "Gage Status" Menu to appear:


I am making a German cockpit, so I click on "Metric Gage." It does not go counterclockwise or full circle, and it is not non linear, so I click on "Done."

Before we go on I want to point out a problem with the cursor arrow. It does not place things using the tip off the needle as you would expect. It uses one of the "wings" of the arrow. Look at the image below, and see where the red arrow is pointing to:


I haven't been able to fix this yet. So, keep this in mind as you make a new gauge.

You should now have the "Gage Options Menu" on the screen. Click on "Set Pivot." This sets the center point of your gauge. So, using the cursor, place the center point on your new gauge. Use the zoom window in the lower left for the best view:


Now click on "Place Needle." This will create a long needle up to the default upper left corner of the screen. Move the cursor to the point you want the needle to START at. For the Vertical gauge, this will be the lowest angle it will display during a dive.

Now the program will ask for the "End Point." This is the highest value during a climb. Finally it will ask for "Offset." This is the area between the center of the gauge and the start of the needle. Many types of gauges have a small cover in the center; this simulates that feature. Move the cursor up and down to increase or decrease this amount. Click when you are satisfied.

The last option is "Color." This sets the color of the needle:


Choosing the second color, the white, should give you a white needle in game. The first color shows cream in the editor, but pink in game, and the third comes out black. I need to investigate this further.

Congratulations, you have created a new gauge! Try it out in game if you like, just remember to save the view first:


Thats all for now, folks.

Cheers!
_________________________
"Blasts from clustered R4M quartets in my snout
And see these English planes go burn...." Blue Oyster Cult

http://members.aol.com/brokenputer/crashin_jack.htm

http://www.sandbaggereaw.com/crashinjack.html

Top Bookmark and Share
#2430513 - 01/24/08 05:15 PM Re: How to Make an Instrument Panel [Re: Crashin' Jack]
Fran_Zee Offline
Member

Registered: 01/15/04
Loc: Bavaria
You´re doing a terrific job, CJ - my admiration

A stupid qustion, btw - is somebody doing a Me 163 3dz for the xterior plane?
_________________________
Greetings

Fran

"Give beer to those who are perishing, wine to those who are in anguish;
let them drink and forget their poverty and remember their misery no more."

(Proverbs 31:6-7)

Top Bookmark and Share
#2430610 - 01/24/08 06:59 PM Re: How to Make an Instrument Panel [Re: Fran_Zee]
LLv34_Doc_1 Offline
Member

Registered: 01/03/01
Loc: France
tutorial saved thanks...

Top Bookmark and Share

#2430906 - 01/25/08 01:49 AM Re: How to Make an Instrument Panel [Re: LLv34_Doc_1]
Crashin' Jack Offline
Member

Registered: 10/02/03
Loc: Chicago
Doc, thanks for saving it mate, there will be more coming - a lot more!

Fran, I chose to use the Me-163 specifically because Sera is doing a new one, and asked me to do the gauges. I thought it would make a great example, as the mix of gauges needed doesn't exist in the default EAW world. For example, the artificial horizon has an additional needle for the turn and bank like that used in British aircraft - but just the top needle. I can do that with ease with the editor.

Check this thread for Sera's original post concerning the Me-163:

http://www.simhq.com/forum/ubbthreads.php?ubb=showflat&Main=256191&Number=2393051#Post2393051

Cheers!
_________________________
"Blasts from clustered R4M quartets in my snout
And see these English planes go burn...." Blue Oyster Cult

http://members.aol.com/brokenputer/crashin_jack.htm

http://www.sandbaggereaw.com/crashinjack.html

Top Bookmark and Share
#2433417 - 01/28/08 01:50 AM Re: How to Make an Instrument Panel [Re: Crashin' Jack]
Crashin' Jack Offline
Member

Registered: 10/02/03
Loc: Chicago
I've gone ahead and put in most of the needles - the airspeed, vertical, tachometer (although it's not showing; I need to trouble shoot that as it was working in an earlier version) fuel, oil pressure and vacuum. The oil pressure and vacuum aren't really correct for the Me-163, they should be chamber pressure 0-6 kg and 025 kg, but this is not modelled in the game so I substituted these. I did a test flight and it looked like this:


Some of the needles aren't quite right but that's okay, we can edit them later. You will also notice there is a white line to the left of the bottom left of the gunsight. This is the artificial horizon. This is not modded with the Cockpit editor as it is from the VCG file. This is the ONLY needle or gauge that has it's data fully in the VCG file; the rest of the data is placement and scaling for the 3D cockpit only. However, we must go through these steps to build up the new panel's instruments.

The next thing to add are the sprites. I want to add the sprite for the landing gear. So I start the editor, load my view, then hit Alt-G to add a new gauge. This time I select "Sprite." This brings up the "Get Gage Type" screen, I select "Gear" and load it:


This brings up the "Gage Options Menu" which we've seen before but now because we chose a sprite for the gage type there is only one option - "Load Sprite:"


Clicking on this brings up the "Load Sprite" selection menu. I scroll down to the sprite for the landing gear, select it and load it. The menu is replaced by the "Gage Options Menu once again, except this time there are two black bars. There should be text here; I'll have to fix that in an upgrade. If you click on the one just below "Load Sprite" it turns red:


This also brings the new sprite on the screen in the upper left corner and the text "Place Sprite" appears on the Menu:


When You are happy with the placement, simply click the mouse button. Now go to the "Gage Options Menu" and when you mouse over the lower black bar, it turns red. This is the "Done" button:


This closes the Gage Options Menu and you are ready for the next edit. Don't be surprised when your new sprite disappears. The editor doesn't show the active stage of the sprite.

Don't forget to "Save Views" when you are finished and ready to leave the program - otherwise all of your new work is lost!

Here is a shot of the gauge with the gear extended:


And retracting:


Cheers!
_________________________
"Blasts from clustered R4M quartets in my snout
And see these English planes go burn...." Blue Oyster Cult

http://members.aol.com/brokenputer/crashin_jack.htm

http://www.sandbaggereaw.com/crashinjack.html

Top Bookmark and Share
#2433547 - 01/28/08 04:43 AM Re: How to Make an Instrument Panel [Re: Crashin' Jack]
Crashin' Jack Offline
Member

Registered: 10/02/03
Loc: Chicago
For the next step I want to add the Gyro type compass to the left of the gun sight. At the time of this tutorial, I have not yet been able to get the Gyro or Altimeter strips to work. But that's okay, because we CAN add them manually. For this you need to use a Hex Editor. Don't woory, it is fairly easy to do. If you can use search functions, copy and paste, then you are all set. You can find many excellent hex editors on the web that are free for use. One ou might try is by HHD Software. They have a free version that will open files up to 10 megs, which will be fine for pretty much everything in the EAW world you might want to edit as long as it is extracted from the CDF file first.

In addition, you will need the gauge extracts from my page at Tally Ho:

http://www.sandbaggereaw.com/crashinjackadd.html

Towards the bottom under the heading "Cockpit Files (for 3dz Modding Only)" the column on the left contains links for each slot's gauge files. Download the set you need and extract them to a folder. You will find all of the gauges, each in their own folder, as well as a readme that is actually the gauge header table for that slot.

Start your Hex Editor and open the Pview file you are working on. I like to resize my editor so I can open Notepad or Wordpad alongside of it with the header table displayed for easy access. The first thing you need to do is find the gauge section. This can vary, especially since we are creating our own file. The originals followed the same sequnce more or less, but there were some significant differences that leads me to believe it depends on what order you do things in.

The best way to find the gauge section is to look at the header chart and find one of the instruments you already added with the editor. Look at the line below the name of the instrument and you will see two sets of four digits each. Find one you have already added that is more than, say, 0000 0300. This is a common number. In my case, I have added the landing gear sprite. In the header table for the 109K slot, the lines for the gear look like this:

*Landing Gear
0400 1100 C044 9D01 0000 0000 0000 0000 0000 0000 0000 0000 FFFF 0000 0000 0000 0000 0000 0000 1F00 3A00 6502 0000 0000 0000 0000 0000 0000 0000 0000 9C06 0000 0000 0000

"0400 1100" is what you are looking for. Lots of the other numbers can and will be different, but these are identifiers for the gauge. They are more complex and likely to not appear too often in the code for the file. So I do a search for "04001100" (take the space between them out!) and I find some code like this:


I've shaded in the area the cursor stopped at as the cusror didn't show up in the screen shot. I did another search from this point and the editor cycled around to the same spot, so i am sure this is it. In addition, if you look 2 lines down in the center, there is a "1F00." This is present in ALL gauges - it's the needle color. Since you didn't change the needle color on the sprite (you can't in the editor because there IS no needle) but it is there none the less, and a good flag that this is the gauge we are looking for.

The rest is really easy to do. Looking in the gauges I have for the 109K slot I see....that the Gyro isn't there! That's okay, the 109k didn't have one - at least not in EAW. So I go looking for a replacement. If you did your homework, you know what the gauge SHOULD look like. Simply find another aircraft that has the type you need. You can see it in this image:


It's the thing to the left of the gun sight. It is the single scale type, like the ones in the P-38s. So I go back and download the gauge set for the P-38H. After extracting I see not one, but TWO Gyros listed. Which is the one I want? If you make sure your resolution is set to 640x480 and pop into the game for a moment, set up a mission for the P-38H and when the screen comes up hit "Alt-F1" all of the gauge names will be displayed. I see the one I want to try is "Gyro 2" so I open that one up in the hex editor, copy the entire file, go back to my Pview file and paste it in just before the landing gear I found earlier.

There is one more step. You must increment the gauge counter. That means you have to find the gauge count bytes and add one to it. AH! But I know where it is. Go to the very top of your Pview file in the hex editor and go to address 280. My Pview file has 07 at this address, so I change it to 08. I save my file in the "cockpits" folder in EAW and start the Cockpit Editor again. I look around and just under the main menu I see the Gyro:


Now I need to move it to it's proper place. Hit "P" on the keyboard and all the existing gauges will have a gray bax around them. Hitting the "G" key puts a red box around the first one, then toggles it's way through the rest of the gauges. Keep hitting it until the Gyro is highlighted:


Now press "Alt-E" to bring up the "Gage Options Menu" and click on "Place Sprite:"


Now you will see that it asks you to "Select Strip Area Upper Right Corner." This SHOULD read "Select Strip Area Upper LEFT Corner." That's another thing that will be fixed in the next release.


After clicking on the spot you want to be the upper left corner, it will ask you to place the next corner,. Again, this is screwed up; place the lower RIGHT corner:


Clcik on "DonE" and you will see this:


Save the Views, exit the editor and game, copy the new Pview over and go for a test fly:


There it is! (I can see I'll have to repaint that gyro case a bit darker!)

So, as you can see once you find the location of your gauges in the Pview file, the rest is pretty simple and the final editing is easy as well. In fact, now you know how to go back and tidy up any gauges that aren't quite right!

Cheers!
_________________________
"Blasts from clustered R4M quartets in my snout
And see these English planes go burn...." Blue Oyster Cult

http://members.aol.com/brokenputer/crashin_jack.htm

http://www.sandbaggereaw.com/crashinjack.html

Top Bookmark and Share
Page 4 of 5 < 1 2 3 4 5 >


Forum Use Agreement | Privacy Statement | SimHQ Staff
Copyright 1997-2012, SimHQ Inc. All Rights Reserved.